Focus Stacking In Manual Focus
Intro
Recently, I have tried 4 different shots with manual focus stacking. These have been inconsistent at best and not usable for large prints. In order to improve my shots, I decided to create a chart that would tell me every focus distance I needed to focus at to create a nice clean focus stack from the minimum focus distance to infinity. Long term, I will create a phone app for myself that I can configure all of the options on in the field and set my focus using the calculated distances. I hope you enjoy my rabbit hole of how to manually focus stack.
Depth of Field
Depth of field (DoF) is one of those subjects that most people understand and don’t understand at the same time. Intuitively people think of depth of field as the area of a scene that is in focus. That is not technically correct. It’s the area of the scene where the light points that are sampled by the sensor are not larger than the circle of confusion (CoC) size. The circle of confusion size limit is based upon image size, viewing distance, and visual acuity. This is why an increase in TV resolution on the same sized TV often does not create a sharper image for normal living room view distances. The size of the image and the view distance matter. You can crank the resolution up but, if there is a not a corresponding increase in image size or a reduction of view distance, you will see little to no change in image quality (unless your TV was not great to start with).
The easiest way to visualize DoF is to imagine a single plane of focus the size of the airy disc with light samples getting larger (aka blurrier) the further from that focus distance. Once the samples get large enough, your eyes will detect them as being out of focus. Airy disc and circle of confusion are discussed later in this post. Here’s a diagram that illustrates how DoF works.
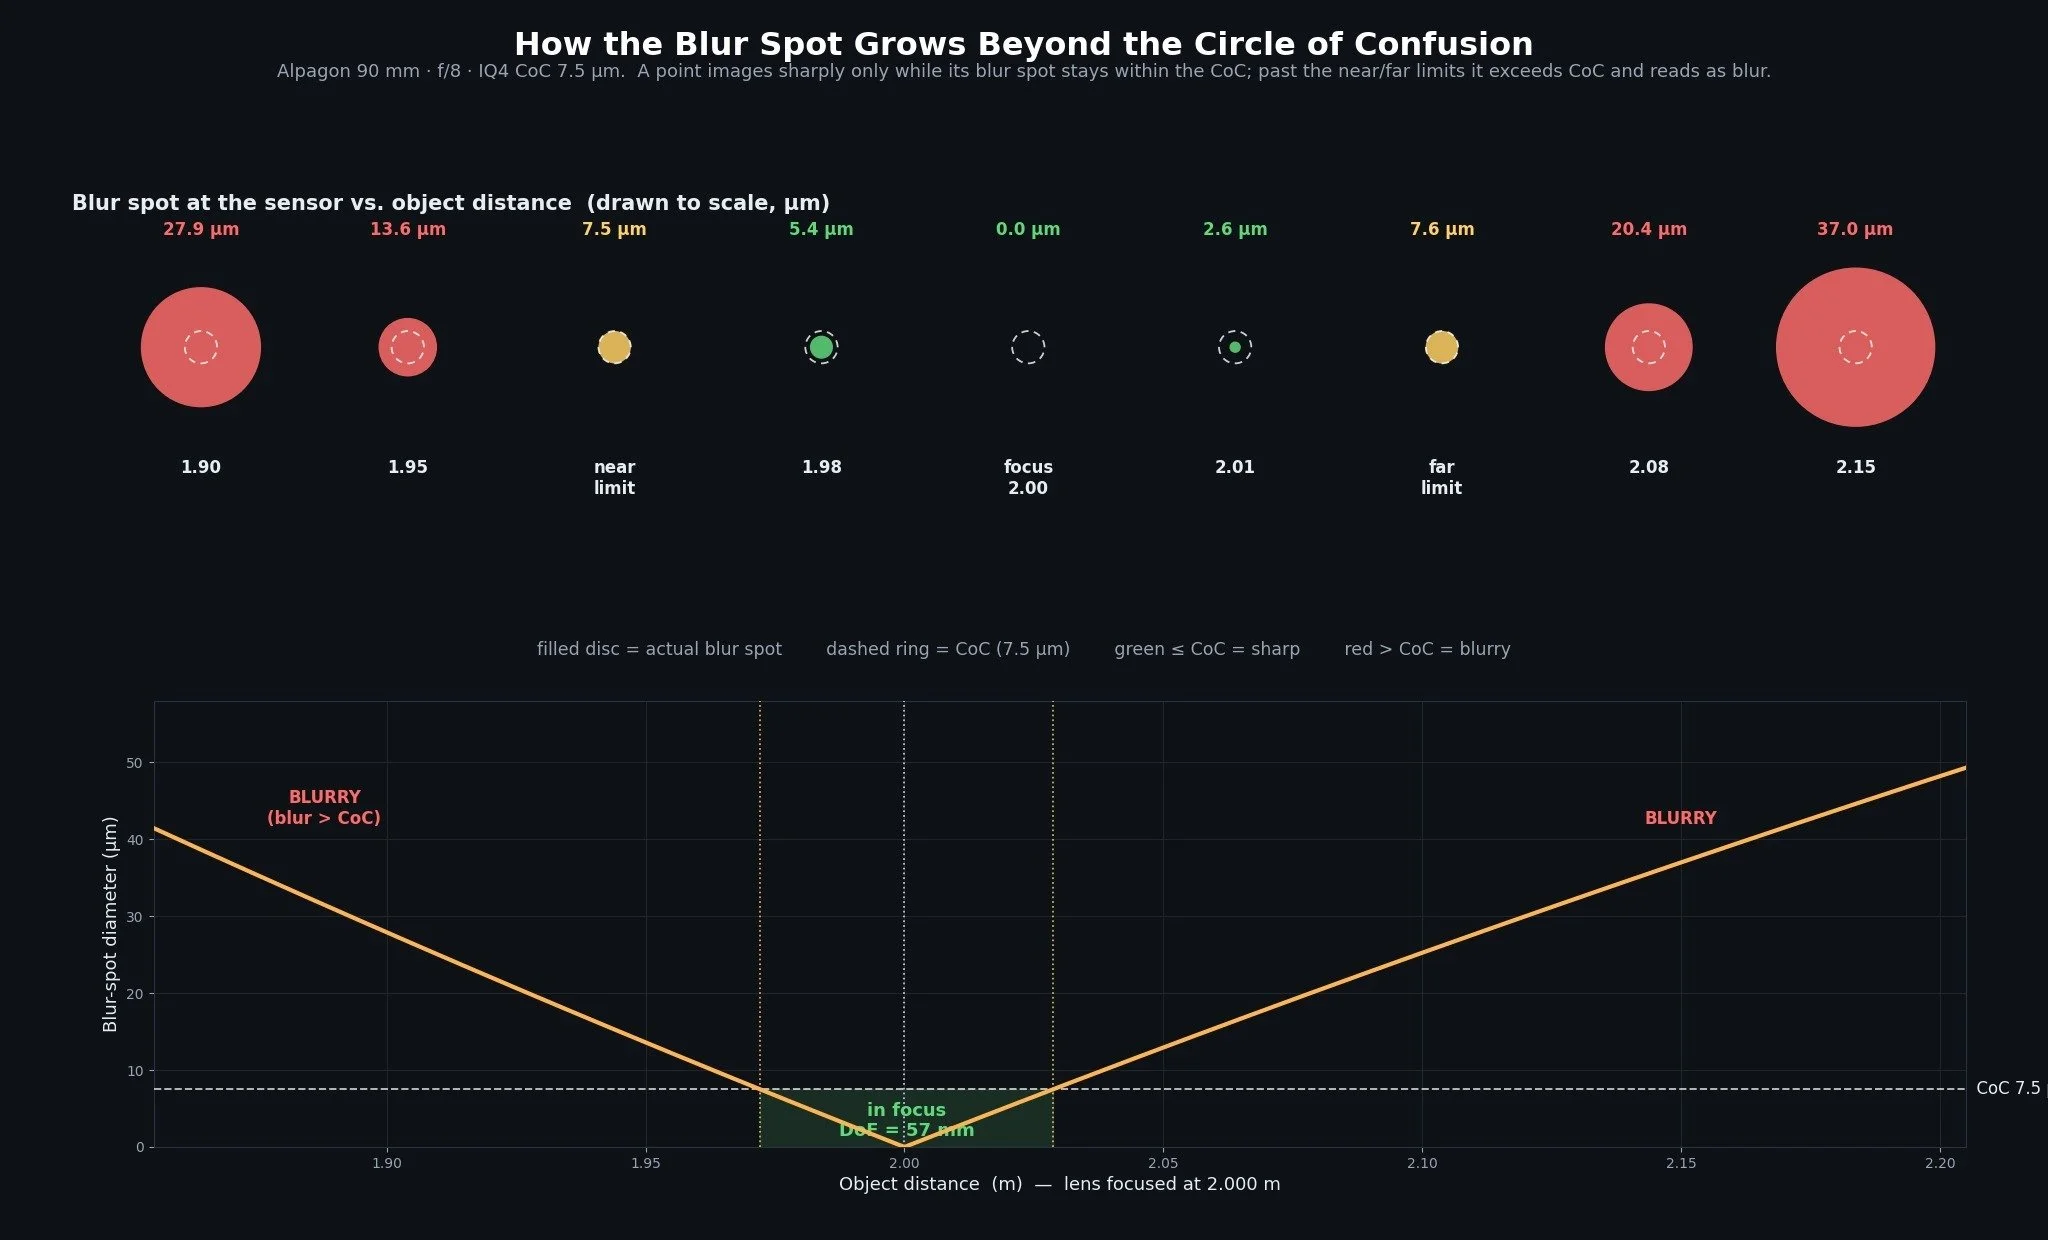
Due to how light waves converge when being focused, the depth of field is larger behind the focus distance than in front of it. This is why there is such a thing as hyper focal distance. This is the focal distance where everything behind that distance to infinity is viewed as in focus. Most lens manufacturers provide charts with the hyper focal distance for each aperture, so you can easily set your lens to that distance and be comfortable that everything is sharp beyond that. Definitely test that assumption out because manufacturing of lenses is not a perfect process and your lens might deviate from what they expect. The Phase One XF has a feature built around this fact, so you can start at the hyper focal distance and search for the exact distance for your lens. You can then store that in the camera and jump right to it with a single button press.
Airy Disc
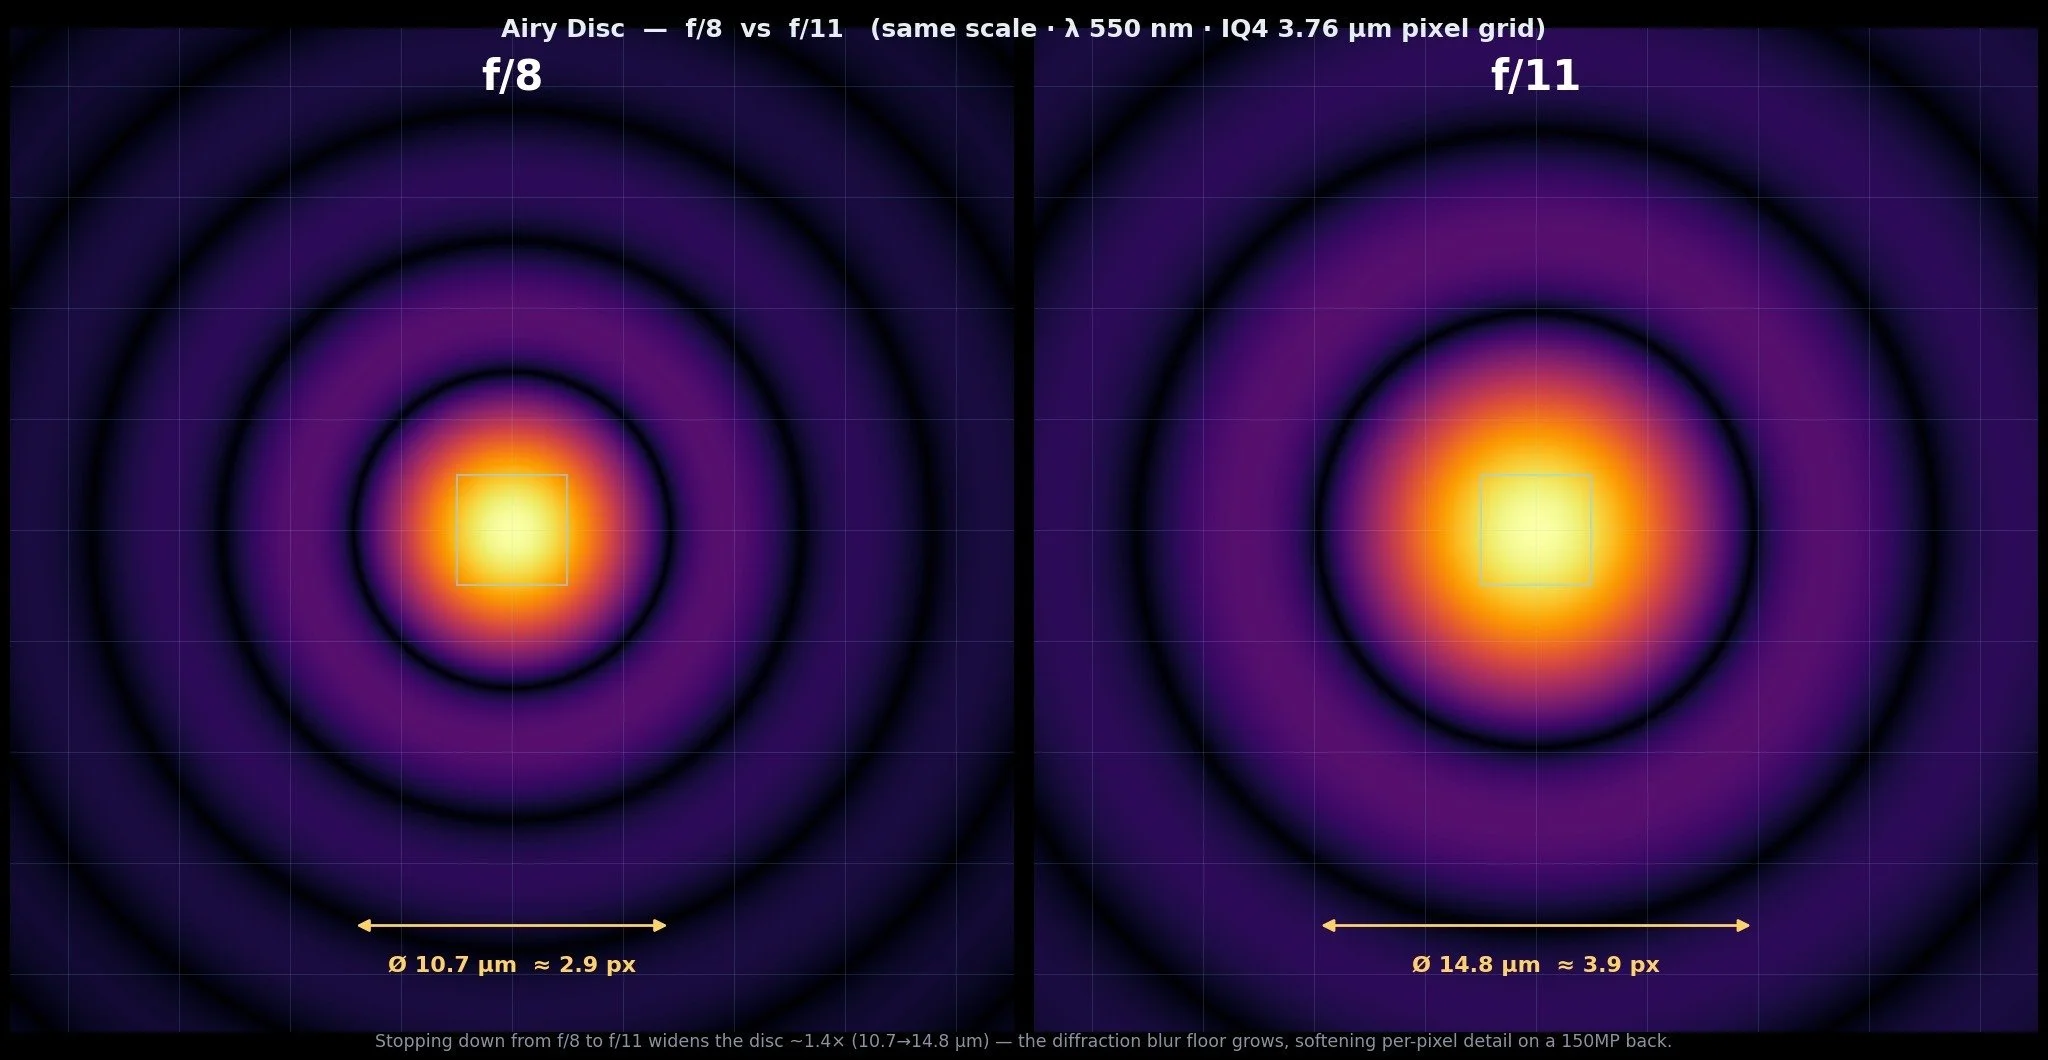
A lens focuses light onto the image plane, whether that plane is film or a digital sensor. The smallest area that light can be focused onto the image plane is called the Airy disc. This is the resolving power of your lens or telescope. Better lenses have higher resolving power, meaning the Airy disc is smaller, but it can never be perfect. If you remember your school years, light is both a particle and a wave, which causes the halos you see in the image below. The Airy disc is not a circle because light diffracts when passing through an aperture spreading based upon the geometry of that aperture. This spreading of light is why there is a limit to “stopping down” to get more depth of field. At certain point the spread of light is larger than the circle of confusion yielding blurry samples. On many modern high resolution sensors, the diffraction limit might be as low as f/8 or f/9. Below is an image showing a mathematically rendered airy disc at f/8 versus f/11 for the gear I use. You can see that f/8 is a much tighter disc than f/11.
Circle of Confusion
Circle of confusion (CoC) is the diameter of the largest airy disc that still counts as "acceptably in focus." As previously noted, focus is only sharp on a plane, assuming your airy disc is not too large due to diffraction, and the area of acceptable focus around it is the depth of field. It is made up of points that are increasingly slightly out of focus and as long as those points are small enough, you can't tell it from a truly sharp point. View distance and physical representation of the image determines what that CoC size is. The size of CoC is the basis for calculating how large the DoF will be at each focus distance. There are 2 methods of calculating the CoC. The image below is the classic formula from 35 mm film days and was calculated to use the maximum print size for a Phase One IQ4 digital back at 300 DPI, rather than the classic 8”×10” print.
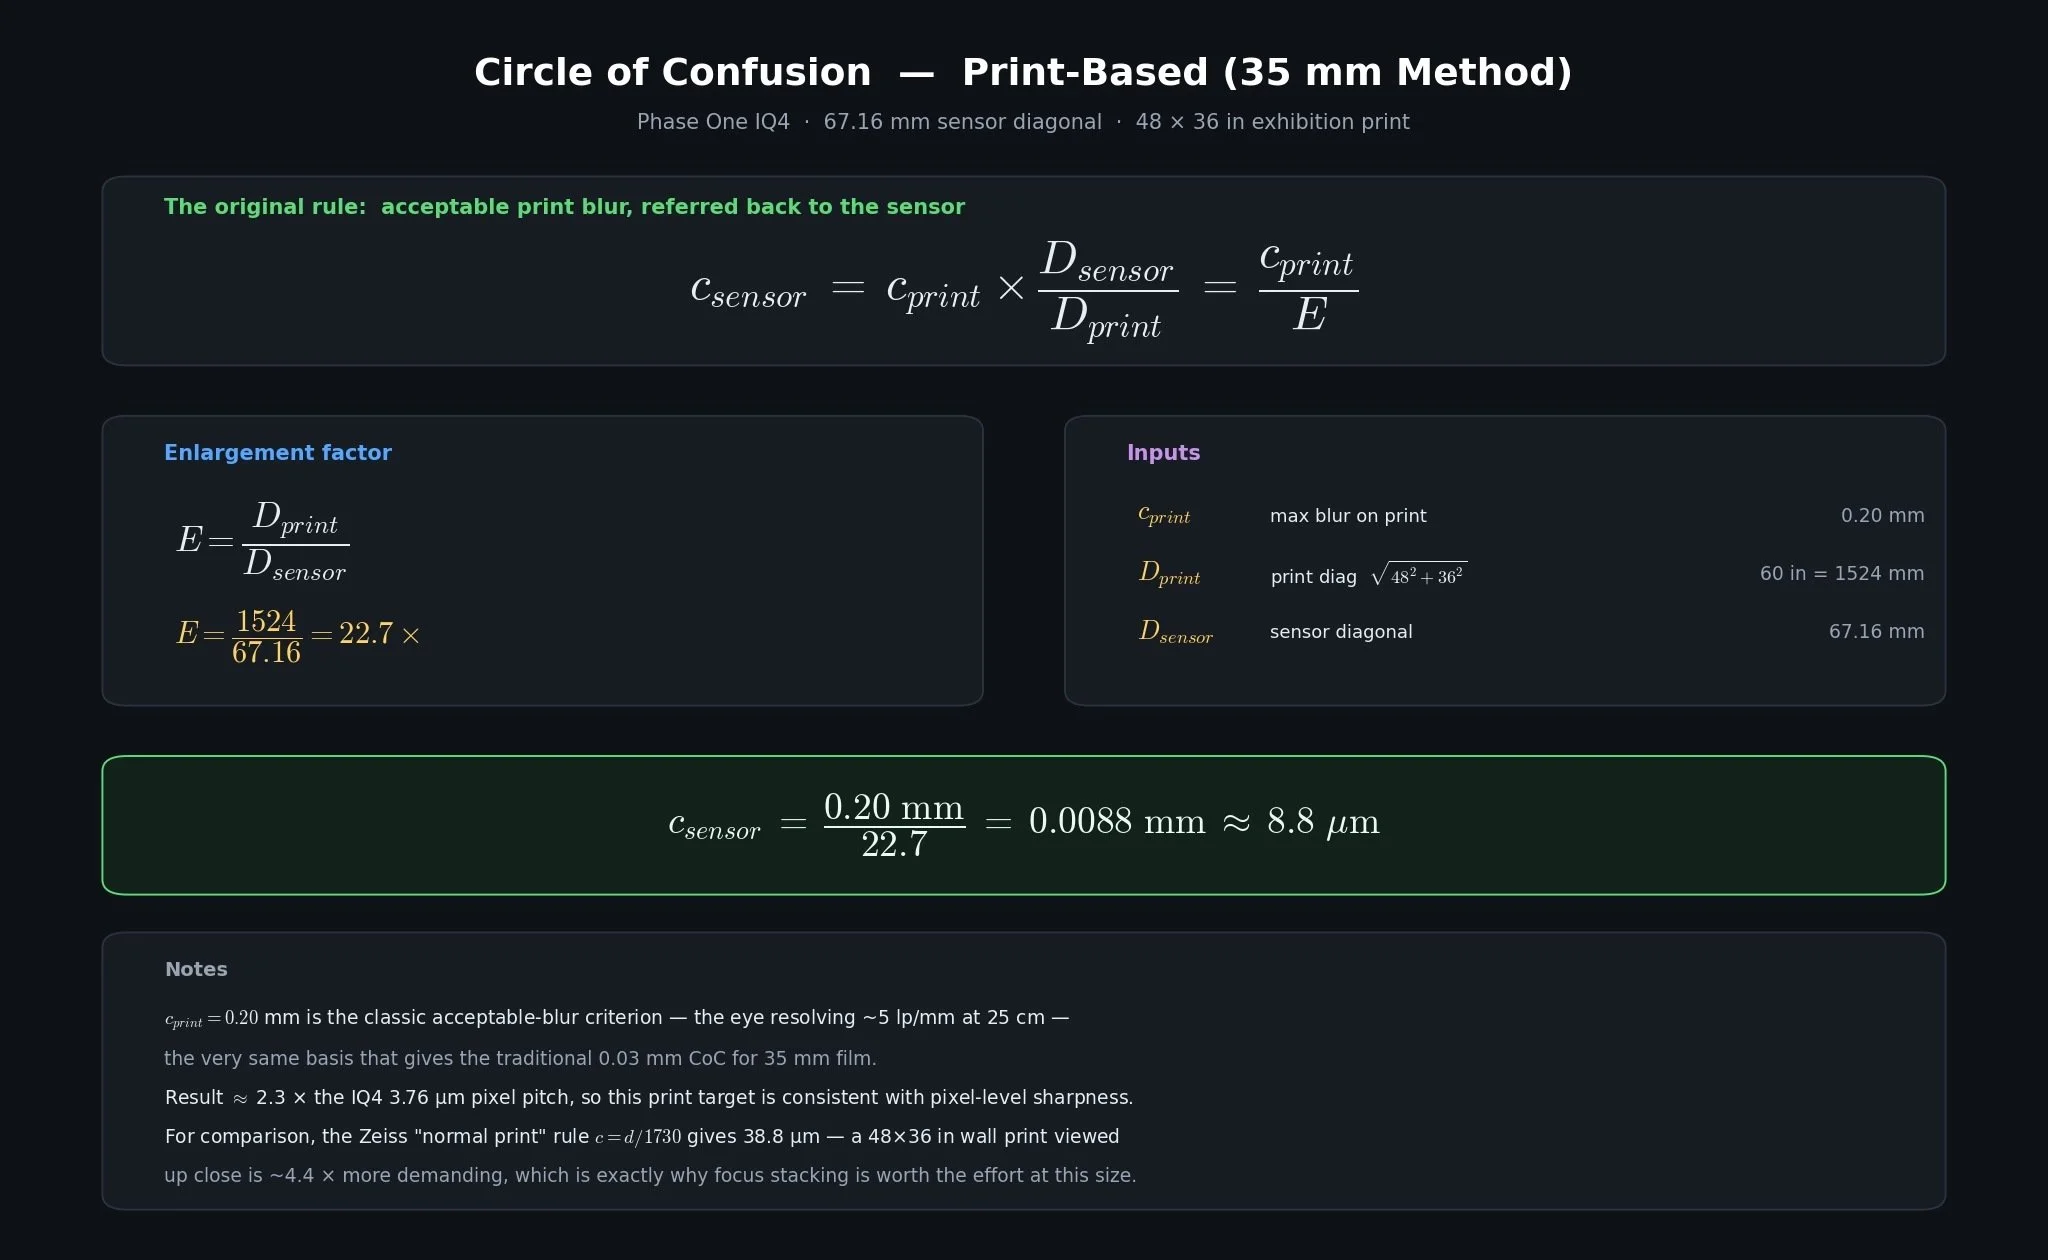
The second way to calculate it is to use the pixel pitch of the digital back to get a theoretical CoC. The pixel pitch for a IQ4 150 MP digital sensor is 00376 mm (3.76 µm). If a disc lands within a single pixel, that pixel integrates it into one value and the blur is invisible. It reads identical to a perfectly focused point. In theory, the that means the pixel pitch is the size of the CoC, but due to the Nyquist-Shanon sampling theorem, it needs to be 2 pixels wide. Their theorem states that to avoid aliasing, a signal must be sampled at a rate greater than twice its highest frequency component, which is the pixel on a sensor. Using that information changes the CoC size to 7.5 µm which is pretty close to the 8.8 µm calculated using the original 35 mm formula.
But What About Diffraction?
In reality, diffraction sets a blur floor that's already larger than a 2-pixel CoC. The Airy disc is ~10.7 µm at f/8 and ~14.8 µm at f/11. So past roughly f/8 on this gear, the real limit on sharpness is diffraction, not the calculated CoC of 7.5 µm. Because of this, f/8 is the sweet spot for this lens-and-back combination: it's the widest aperture that's still comfortably diffraction clean at the pixel level.
Generating Focus Stack Distances
Now that we have 3 different options for CoC (2x pixel pitch, the 35 mm formula, and the Airy disc size), we can generate a chart to tell us exactly where to focus from minimum focus distance to hyper focal distance. The Airy disc version is the most permissive size and generates fewer images taken while the 2x pixel pitch value requires the most shots with the 35 mm version in-between.
In order for the stacking software to be able to stack clean images, there needs to be some overlap in the depth of field selections. The reason is that the edge of a DoF zone isn't a hard boundary. Sharpness falls off gradually and the near/far limits are defined at the CoC threshold. If you butt two zones together at 0% overlap, the seam between them is built entirely from each frame's worst, limit-of-acceptable data. On a 150MP file at 100%, that shows up as a faint soft band exactly at the transition. Overlap exists so that every point in the scene is captured comfortably inside at least one frame's DoF, giving the stacking software (Helicon, Zerene) good source data to sample from. Additionally, you need to allow for margin of real-world error caused by helicoid backlash, detent imprecision, focus breathing, the slight magnification changes between frames, vibration, and thermal drift. Overlapping the depth of field can cover those potential problems.
In practice:
~10% is the absolute minimum to avoid outright gaps, but it leaves zero margin and tends to produce visible seams. Why even stack if this is ok?
~15% is reasonable if you're careful and the subject is smooth/low-contrast.
20–33% is the reliable working range
>33% is diminishing returns, more shots, more data, no real quality gain.
The chart below uses 20% because that is a good trade off between generating too many images and providing too few.
Focus-Stacking Chart — Alpagon 90mm × Phase One IQ4 150MP
Overlapping depth-of-field steps from the lens’ minimum focus (~1.1 m) to infinity, ~20% overlap. Pick the circle-of-confusion basis below — the tables and frame counts recompute instantly.
| # | Focus dist. | DoF near | DoF far | Depth | Step (µm)* |
|---|
How to shoot: start at frame 1 (nearest focus) and work outward — set each Focus dist. or advance the focus ring by the Step amount. The last row is the hyperfocal setting; focusing there carries sharpness to infinity.
*Step = focus-mount extension change from the previous frame (µm). CoC bases: 2× pixel pitch is the strict per-pixel target; 35 mm method refers acceptable blur on a 48×36 in print back to the sensor; Airy disc sets CoC to the diffraction floor at the working aperture (widest steps). Geometric defocus and diffraction add in quadrature, so real-world frame counts sit between the pixel-pitch and Airy results.
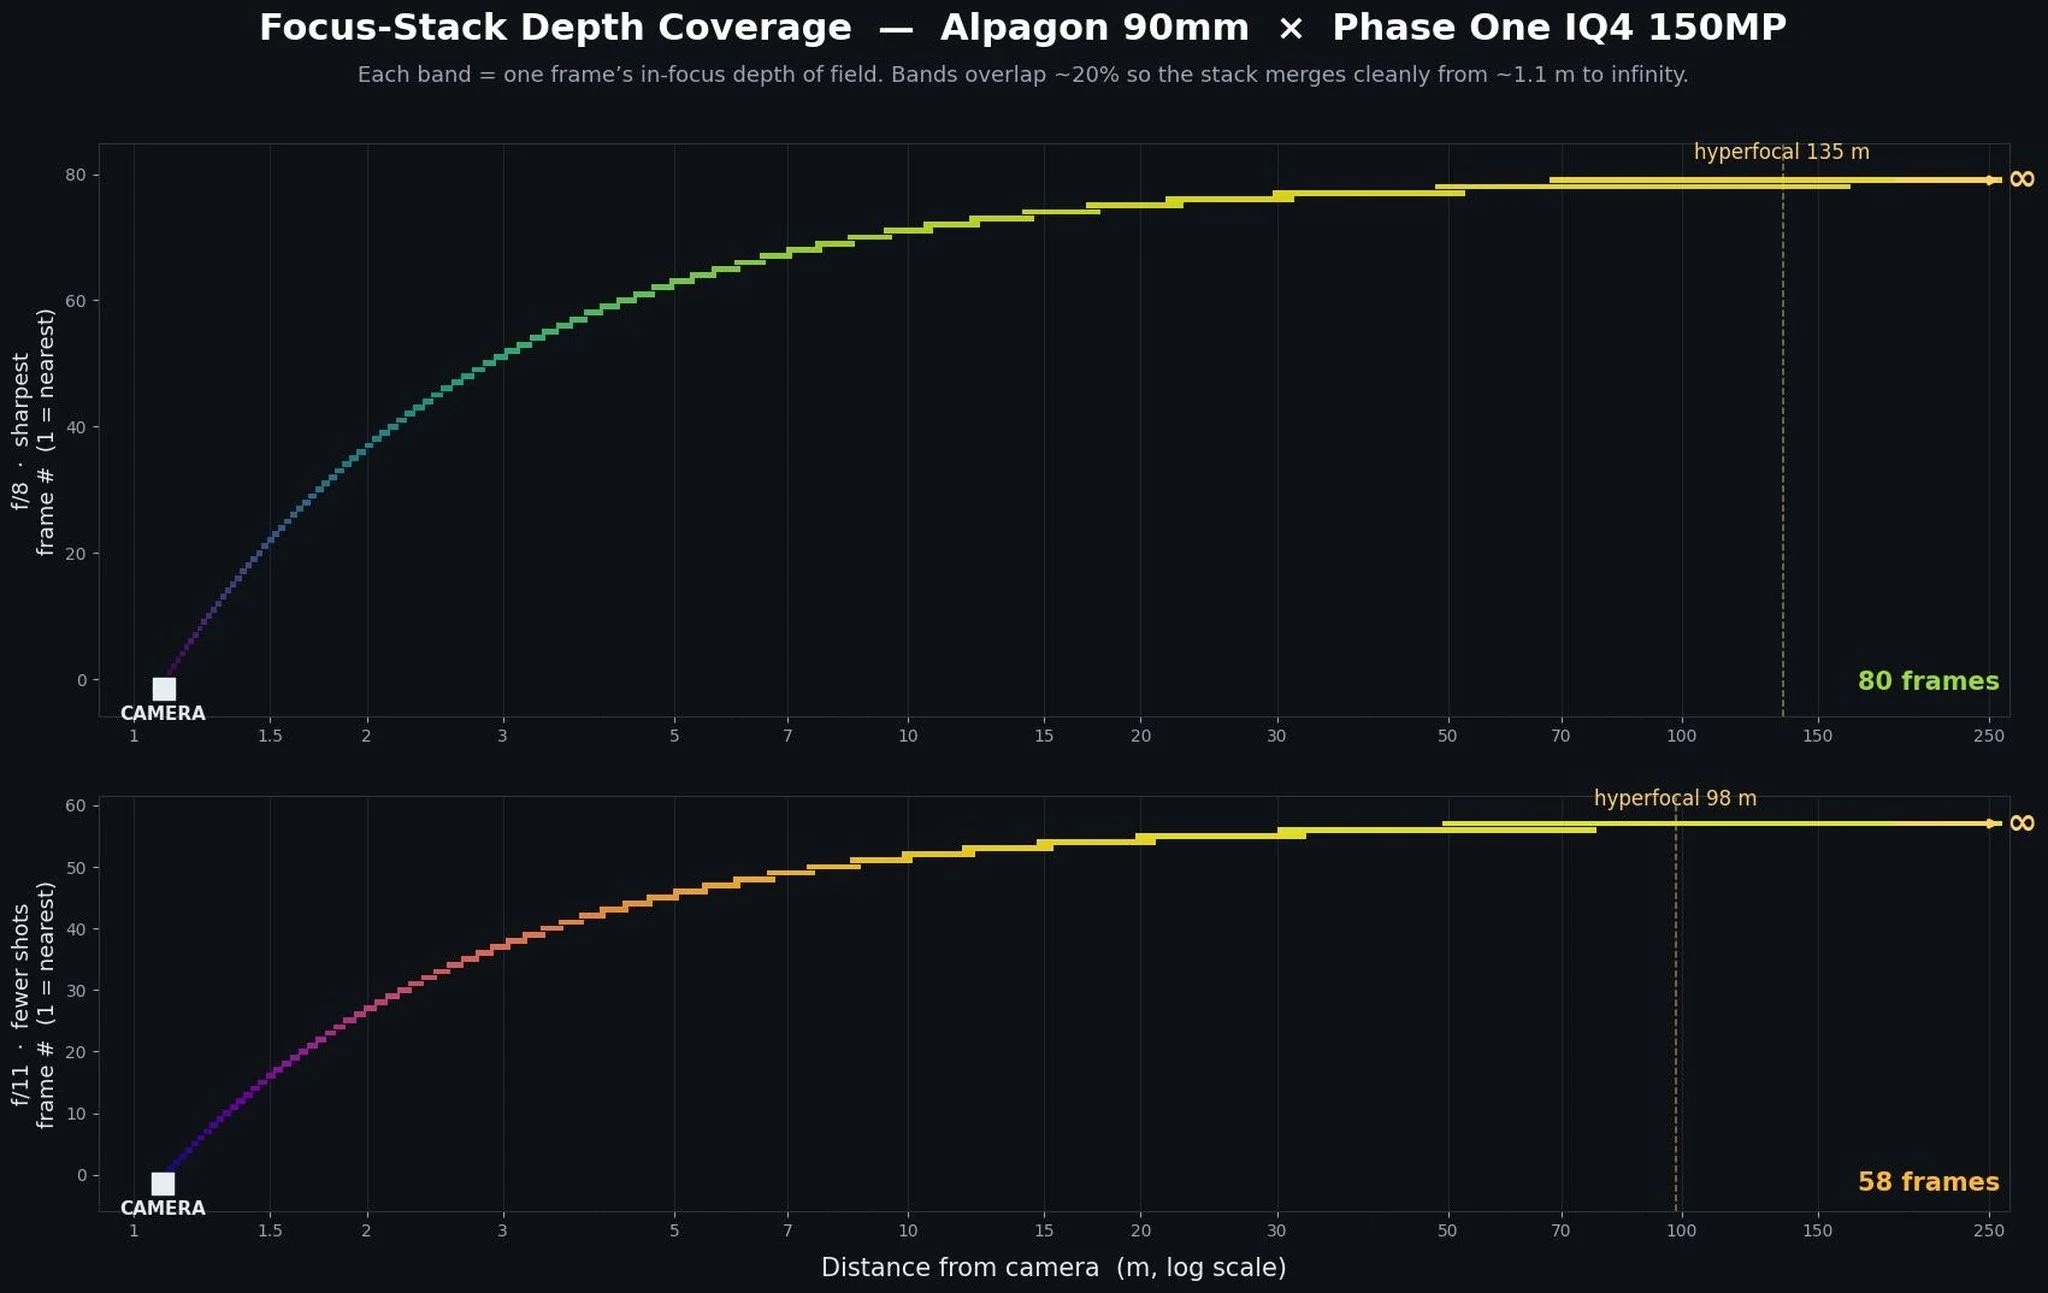
The graphic below illustrates the overlap and distance coverage for the 2x pixel pitch CoC size with a 20% overlap. 80 images is probably impossible to stack by hand so I will be very cognizant of the closest point to my scene if I go this route. I am used to stacks of a 100 or 200 images when shooting macro photography but I use the Phase One XF’s built in feature to automatically do them.